How to Build Paper Airplanes
Materials Needed
Before getting started, you will need a few materials:
- Standard 8.5 x 11-inch paper
- Scissors
- Pencil
- Ruler (optional)
Steps to Build Paper Airplanes
Step 1: Choose your paper
Start by choosing the type of paper you want to use. You can use any standard 8.5 x 11-inch paper, but some types may work better than others. For example, printer paper is a good choice because it is relatively lightweight and easy to fold. However, you can also use construction paper or even newspaper.
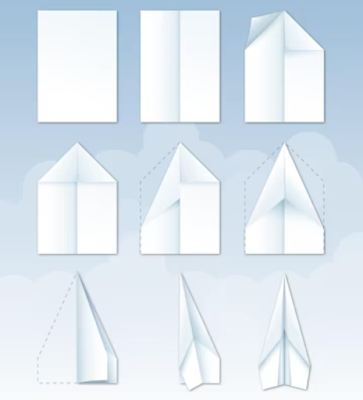
Step 2: Fold the paper in half
Take your paper and fold it in half lengthwise. Make sure the edges are lined up and the crease is sharp. Then, unfold the paper.
Step 3: Fold the top corners
Take the top corners of the paper and fold them down to the center crease. Make sure the edges are lined up and the corners are sharp. Then, unfold the paper.
Step 4: Fold the top edges
Take the top edges of the paper and fold them down to the center crease. Make sure the edges are lined up and the crease is sharp. Then, unfold the paper.
Step 5: Fold the bottom corners
Take the bottom corners of the paper and fold them up to the point where the top edges meet the center crease. Make sure the edges are lined up and the corners are sharp. Then, unfold the paper.
Step 6: Fold the wings
Take the top corners of the paper and fold them down to the point where the bottom corners meet the center crease. Make sure the edges are lined up and the corners are sharp. Then, unfold the paper.
Step 7: Fold the wings again
Take the top edges of the paper and fold them down to the crease made in step 6. Make sure the edges are lined up and the crease is sharp. Then, unfold the paper.
Step 8: Fold the plane in half
Take the paper and fold it in half along the center crease. Make sure the edges are lined up and the crease is sharp. Then, unfold the paper.
Step 9: Fold the wings down
Take the wings and fold them down along the creases made in steps 6 and 7. Make sure the edges are lined up and the wings are symmetrical. Then, fold the bottom edges up to create a small triangular flap.
Step 10: Finish the plane
Finally, fold the wings down again along the crease made in step 7. Make sure the edges are lined up and the wings are symmetrical. Your paper airplane is now complete!
Tips and Tricks
Make adjustments for better flight
If your paper airplane is not flying well, try making some adjustments. You can try folding the wings up or down, or adjusting the angle of the wings. You can also try adding weight to the front or back of the plane.
Experiment with different paper types
You can experiment with different paper types to see which works best for your paper airplane. Thicker paper may make a sturdier airplane, while lighter paper may allow for better flight.
Use a ruler for more precise folds
If you want your paper airplane to be more precise, use a ruler to make your folds. This can help to ensure that your airplane is symmetrical and balanced.
Pros and Cons of Building Paper Airplanes
Pros
- Fun and easy activity for all ages
- Improves hand-eye coordination and creativity
- Can be done with materials found at home
Cons
- May not fly well if not folded correctly
- May not hold up well if made with thinner paper
- Can be frustrating if unable to get the airplane to fly well
Conclusion
Building paper airplanes can be a fun and easy activity for all ages. With a few simple materials and some basic folding techniques, you can create a variety of different airplanes. Whether you are looking to pass the time or improve your hand-eye coordination, building paper airplanes is a great way to go!
FAQ
Q: Can I use any type of paper to build a paper airplane?
A: Yes, you can use any standard 8.5 x 11-inch paper to build a paper airplane. However, some types may work better than others.
Q: How can I make my paper airplane fly better?
A: You can make adjustments to your paper airplane, such as folding the wings up or down, adjusting the angle of the wings, or adding weight to the front or back of the plane.
Q: Is building paper airplanes a good way to improve hand-eye coordination?
A: Yes, building paper airplanes can help to improve hand-eye coordination and creativity.
Q: Can I make my paper airplane more precise by using a ruler?
A: Yes, using a ruler can help to make your folds more precise and ensure that your airplane is symmetrical and balanced.

